Upgrading your computer’s hardware can be an exciting way to boost performance, but it can also lead to unexpected issues with your Windows operating system.
Changing your motherboard can cause Windows to switch editions or fail activation, as it might not find a matching license. Learn how to prepare your device for hardware upgrades to avoid these issues.
In this article, we’ll explore why these issues happen, what steps to take to reactivate Windows, and how to avoid these problems, ensuring a smooth transition after your hardware upgrade.
Understanding Windows Activation and Licensing
Windows operating systems use activation mechanisms to verify that your copy is genuine and hasn’t been used on more devices than the license terms permit. There are primarily two types of licenses:
- OEM Licenses (Original Equipment Manufacturer): These are tied to the hardware, specifically the motherboard, and are non-transferable. If you replace the motherboard, the OEM license becomes invalid, necessitating a new license for activation.
- Retail Licenses: These can be transferred to new hardware. However, significant hardware changes, like replacing the motherboard, may still require reactivation. Microsoft provides tools to assist in reactivating Windows after such changes.
Impact of Motherboard Changes on Windows Activation
The motherboard is a critical component that Windows uses to identify your computer. Changing it can be perceived as setting up a new device, leading to activation issues:
- OEM Licenses: Since these licenses are tied to the original motherboard, replacing them typically invalidates the license, and Windows will require a new activation key.
- Retail Licenses: While more flexible, a motherboard change can still trigger deactivation. Before making hardware changes, you’ll need to reactivate Windows, often by linking your license to a Microsoft account.
Also Read: What Are Motherboard Diag Jumpers Marlin – Complete Guide!
Types of Windows Licenses and Their Role in Hardware Changes
Understanding your Windows license type is crucial:
- OEM Licenses
- Tied to the original motherboard.
- Non-transferable under most circumstances.
- Retail Licenses
- It can be reactivated on new hardware.
- Require linking to a Microsoft account for easier reactivation.
- Volume Licenses
- Used by organizations.
- It may involve additional reconfiguration steps after hardware changes.
Unexpected Changes in Windows Edition After Hardware Upgrade
In some cases, users have reported that after changing hardware components like the motherboard, Windows requires reactivation and changes its edition (e.g., from Windows 10 Pro to Windows 10 Home). This can occur due to:
- Embedded Product Keys: Some motherboards, especially those from OEM manufacturers, come with embedded product keys in their BIOS/UEFI firmware. If you replace your motherboard with one that has an embedded key for a different Windows edition, your system might default to that edition upon reinstallation or reactivation.
- Installation Media: The Windows installation media might detect the embedded key and automatically install the corresponding edition. This can lead to an unexpected change in the Windows edition after a hardware upgrade.
Steps to Reactivate Windows After a Motherboard Change
To ensure a smooth reactivation process after changing your motherboard, follow these steps:
- Link Your Windows License to a Microsoft Account: Before making any hardware changes, link your Windows license to your Microsoft account. This association can simplify the reactivation process.
- Use the Activation Troubleshooter: After replacing the motherboard, if Windows isn’t activated, navigate to Settings > Update & Security > Activation, and use the Activation Troubleshooter. Sign in to your Microsoft account and select the device you’re currently using to reactivate Windows.
- Contact Microsoft Support: If the troubleshooter doesn’t resolve the issue, consider contacting Microsoft Support for assistance with reactivation.
Preventing Unexpected Edition Changes
To prevent Windows from changing editions after a motherboard replacement:
- Be Aware of Embedded Keys: When purchasing a new motherboard, check if it has an embedded Windows product key and ensure it matches your current Windows edition.
- Use the Correct Installation Media: When reinstalling Windows, use installation media corresponding to your licensed edition. Avoid using media that might detect and apply an embedded key for a different edition.
What Happens When You Change Your Motherboard?

When you change your motherboard, your computer sees it as a new device. The motherboard is a key part of your system’s identity.
If you have a Windows OEM license, it’s tied to your old motherboard so that it won’t work on the new one.
Even with a retail license, you might need to reactivate Windows. Sometimes, replacing the motherboard can also cause changes in your computer’s settings or how Windows works.
Why Does Windows Change Editions After a Motherboard Upgrade?
Windows might change editions after a motherboard upgrade because some have a built-in Windows product key.
If this key is for a different edition, like Windows Home instead of Pro, your system may switch editions.
Also, the Windows installation process might detect the new motherboard’s embedded key and automatically install or activate the edition it matches. This can be frustrating but can often be fixed by reactivating Windows with your original license key.
How to Check Your Current Windows License and Edition
To check your Windows license and edition, start by opening Settings. Go to System > About and see the Windows edition listed there.
To determine if your license is OEM or Retail, open the Command Prompt, type slmgr -dli, and press Enter. This will show your license details.
Also, check if your Windows license is linked to your Microsoft account in Settings > Accounts. Knowing these details helps you prepare for changes like hardware upgrades.
Must Read: What Motherboard Does Alienware Use: All You Need To Know!
Step-by-Step Guide to Reactivate Windows After a Hardware Change
1. Prepare Before Changing Hardware
- Link your Windows license to your Microsoft account via Settings > Accounts.
- Back up important files and settings to avoid data loss.
2. Change the Hardware
- Replace your motherboard carefully, following the manufacturer’s instructions.
3. Check Activation Status
- Go to Settings > Update & Security > Activation to see if Windows is still activated.
4. Use the Activation Troubleshooter
- In the Activation section, click Troubleshoot, then select I changed hardware on this device recently.
- Sign in with your Microsoft account and select the device you’re using to reactivate Windows.
5. Enter Your Product Key
- If troubleshooting doesn’t work, enter your original product key under Change Product Key.
6. Contact Microsoft Support
- If you still have issues, contact Microsoft Support for assistance with manual reactivation.
Tips to Avoid Windows Activation Issues
- Link Your License to a Microsoft Account: Connect your Windows license to your Microsoft account for easier reactivation after hardware changes.
- Backup Important Data: Always create a backup of your files and settings before making hardware upgrades.
- Check Motherboard Details: Verify if the new motherboard has an embedded Windows product key and ensure it matches your current edition.
- Keep Your Product Key Safe: Store your Windows product key securely if you need it for reactivation.
- Use Correct Installation Media: Install Windows using the media that matches your original edition to avoid unexpected changes.
- Contact Support Early: If you’re unsure about activation steps, contact Microsoft Support before making changes.
Best Practices for a Smooth Transition During Hardware Upgrades
- Research Compatibility: Ensure the new motherboard is compatible with your CPU, RAM, and other components.
- Link Windows License to Microsoft Account: Associate your Windows license with your Microsoft account to simplify reactivation.
- Backup Your Data: Save all important files to an external drive or cloud storage before starting the upgrade.
- Use Proper Tools and Procedures: Follow the manufacturer’s guide and use appropriate tools to avoid damaging components.
- Prepare Installation Media: Have the correct Windows installation media ready if you need to reinstall the OS.
- Check Embedded Product Key: Verify if the new motherboard has an embedded key, and ensure it matches your licensed edition.
- Recheck Connections: Ensure all cables and components are properly connected after installing the motherboard.
- Update BIOS and Drivers: Update the BIOS and install the latest drivers for the new motherboard after installation.
- Use Activation Troubleshooter: If Windows doesn’t activate automatically, use the Activation Troubleshooter in Settings.
- Contact Microsoft Support if Needed: Reach out to Microsoft if activation or other issues persist after the upgrade.
Changed Motherboard and Windows Changed Editions Windows 11
When changing the motherboard in Windows 11, activation issues may arise, and the system could switch editions due to embedded keys. Reactivate using your Microsoft account or original product key to restore the correct edition.
Changed Motherboard and Windows Changed Editions Windows 7
Windows 7 uses OEM licenses that are often tied to the motherboard. Changing it can cause activation failure or edition changes.
Since Windows 7 is unsupported, resolving issues may require purchasing a new license or upgrading to a newer version.
Changed Motherboard and Windows Changed Editions Windows 10
In Windows 10, changing the motherboard may deactivate your license or switch editions if an embedded key exists. Link your license to a Microsoft account beforehand to easily reactivate and ensure the correct edition remains installed.
Changed Motherboard and Windows Changed Editions USB
If you install Windows using a USB after a motherboard change, it might detect an embedded key and change editions.
Ensure the USB contains installation media matching your licensed Windows edition to avoid unexpected changes or activation issues.
Need To Know: Motherboard Yellow Light: Tips To Diagnose & Fix The Problem
Unable to Activate Windows After Hardware Change
If Windows doesn’t activate after hardware changes, use the Activation Troubleshooter in Settings. Log into your Microsoft account, select the current device, and reactivate. Contact Microsoft Support if reactivation doesn’t resolve the problem.
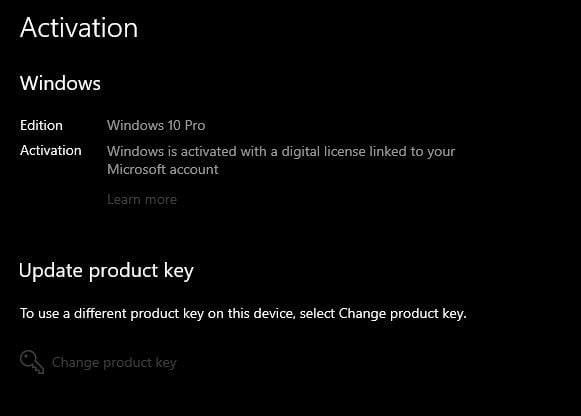
Windows is Activated with a Digital License Linked to Your Microsoft Account
A digital license linked to your Microsoft account simplifies activation after hardware changes. After replacing your motherboard, sign into your account and use the Activation Troubleshooter to reactivate Windows without needing a product key.
FAQs
1. Cannot Activate Windows After Motherboard Change
If Windows won’t activate after changing the motherboard, try using the Activation Troubleshooter in Settings. Log in with your Microsoft account for easier reactivation.
2. Re-activating Windows 10 after motherboard change
To reactivate Windows 10 after a motherboard change, sign in with your Microsoft account and use the Activation Troubleshooter. If necessary, enter your product key.
3. Activation of an OEM version after changing the mainboard
OEM versions are tied to the original motherboard. After changing it, you may need a new license. Contact Microsoft Support for help with reactivation.
4. How Can I Reactivate My Windows 10 After Changing My Motherboard?
Sign into your Microsoft account, then use the Activation Troubleshooter. If it doesn’t work, enter your product key or contact Microsoft Support for assistance.
5. Windows Saying Its Not Activated When I Just Changed To A New Motherboard
If Windows shows as not activated after a motherboard change, try the Activation Troubleshooter. You may need to link your license to a Microsoft account.
6. Windows Edition Doesn’t Match While Activating After Motherboard Change??
The new motherboard may have an embedded key if the edition doesn’t match. Ensure the installation media matches your license, or use the Activation Troubleshooter.
7. Changed Motherboard, CPU And CPU Cooler And Now It Says I Don’t Have Windows?
Changing the motherboard and CPU can trigger activation issues. Use the Activation Troubleshooter to reactivate Windows and ensure your license is linked to your Microsoft account.
Conclusion
In conclusion, changing your motherboard can cause Windows activation issues or edition changes. You can avoid complications and reactivate Windows smoothly by linking your license to a Microsoft account, using the Activation Troubleshooter, and ensuring proper installation media.